You know what I'm craving? A little perspective. That's it. I'd like some fresh, clear, well seasoned perspective. Can you suggest a good wine to go with that? --Ratatouille (Pixar, 2007)

Tuesday, March 26, 2013

"Almost Too Real" Thai--Olieng Thai in New York City, NY

Bloggers and foodies alike often talk about the spots that are "authentic" or "the real thing." Nowadays, with millions of brilliant fine dining spots to find on the daily, some just want to chow down on a simple plate of "real" food. People search for these spots in spite of wanting to pay a big price for an overwhelming plate full of multiple proteins, sauces, side dishes and garnishes. As interesting as the titles sound, not every meal needs to be eaten at a "gastro-pub" or a "trendy tapas bar."The search for genuinely cultural spots has expanded and become popularized.

Late last week I was on an overnight trip to New York City with my school newspaper staff. Set loose in Midtown for dinner, we gazed up at all the signs and storefronts, wondering which to pick. Many wanted Thai food--so we of course all pulled out our iPhones simultaneously and Googled the obvious, "Thai Food+ Midtown+ NYC." We sifted through a few Yelp reviews until we found a favorable restaurant, Olieng (at 46th and 10th), one that coincidentally fit my prior descriptions in the form of seeming as authentic as possible.

First, let me establish that Olieng is small. Not like a Chipotle small or a Saladworks small...I'm talking REALLY Small.  Olieng is so small it's as if any more than you and a few other people are in it--it might just overheat. Nevertheless, a menu filled with variety, a quick and handy waitstaff, and a small but cutesy New York atmosphere was plenty to get our meal going. If I had one complaint about the atmosphere it would have to have been that the right wall is half mirror covered in messages written by customers. If you look at it it's kind of unpleasant and dizzying, but it didn't get in the way of a nice meal.

Finally--the food. To start, one of us ordered their vegetarian Thai spring rolls. The rolls were nice and crispy, if a little "veggie" for me. As you can see in the picture to the bottom/right, half the roll was loaded with some spinach. Nevertheless, with a hefty dip in the thick, satay-like sauce, the rolls were a nice clean start to the meal. Thai food is kind of the anti-Chinese food when it comes to the density and heaviness of their appetizers. We entered the full meal feeling fresh, light, and held over until our food came.


After our appetizers, our entrees came. While one of us ordered an interesting dish entitled, "Red Curry Chicken," others (including myself) felt that it would be a waste not to try their most traditional dish--pad thai. I got beef and one of my friends, a vegetarian, got tofu. As you can see in the pictures, the dishes looked just as the restaurant itself looked--homely and authentic.

I felt as though I was eating food that people from legitimate Thai backgrounds might actually eat... unlike the fancy, over-presented Thai food available in other places in the city.
-After asking my friend if "medium spicy" was okay for her Red Curry, it was delivered packing quite the punch. Noticeably spicy yet well made and cooked, the Red Curry was a nice looking traditional Thai dish.
-The Pad Thai was above average and well made. Cooked correctly and spiced handily, the Pad Thai got the job done as I thought it would.

So, next time you're in New York City and want something less intense and over-the-top, a traditional Thai meal at Olieng might just hit the spot for you like it did for us.

ALSO: Big thanks to one of my fellow editors of the school newspaper: All these photos are courtesy of the fabulous photographer Efi Narliotis. Her magical work with a camera makes every bite look more and more delicious. 

Friday, January 25, 2013

Andy Makes Ming's w/ a Twist!

Hey Everyone!

Besides normal food blogs, the world has become overflowing with a trend we know as "food porn." Websites that primarily show delicious pictures of delectable dishes, food porn is generally better looked at than cooked. "foodporndaily.com" has become a fan favorite due to the fact that it definitely stays true to its slogan, "click, drool, repeat."

One food blog showing its own version of food porn is Mingmakescupcakes.yolasite.com. The site's cook, a secret person named Ming, doesn't post stories like me. Rather, Ming just posts delicious pictures of cupcakes he makes that have short and sweet recipes. I, dying over his amazing looking cupcakes, decided to try one of his succinct recipes.

I was drawn in by the "Sour Cream Fig" cupcakes with cream cheese frosting. I loved the idea because I knew that sour cream often makes cupcakes deliciously moist. However--one twist. I had a delicious jar of date preserves. Thus, I swapped the fig jelly for date jelly. (Don't worry it turned out delicious, not too different.) The recipe is as follows:

CUPCAKE
2 cups flour
1 tsp baking soda
pinch of salt
2 sticks butter
2 cups sugar
2 eggs
1/2 tsp vanilla
1 cup sour cream
fig jam or preserves (but I used date)


Light oven to 350 degrees.
 
 In a mixer, cream butter and sugar on medium until light and fluffy. Reduce speed to low and add vanilla and egg. Stir in sour cream. In a separate bowl, mix flour, baking soda, and salt.  Add flour mixture to wet mixture.  

The process for filling the cupcakes looks like the following:
Fill cupcake liners 1/3 full.  Place a spoonful of fig jam in the center.  Cover with batter.  


Bake at for 20 minutes, or until toothpick comes out clean.

FROSTING
8 oz. room temp. cream cheese
1 stick room temp. butter
1 lb confectioner’s sugar
1 tsp vanilla

My frosting ended up kind of soupy because I was using cream cheese pulled outta the freezer and microwaved--but--this recipe is kind of weird, so I'm going to give you my classic cream cheese frosting recipe. Use whichever you want, but the one below is slightly more foolproof. 

1 pound cream cheese, softened
4 cups sifted confectioners' sugar
2 sticks unsalted butter (1 cup), softened
1 teaspoon vanilla extract


Anyway, happy cooking. Hope yours turn out as nicely as mine!

Saturday, December 29, 2012

Quick and Awesome Quiches

Hey Everyone,
As long as you're in the process of getting snowed in, why not cook? Recently, I had to cook up an appetizer/hor d'oeuvre for a small neighborhood party. I realized--I don't really do appetizers. I thought momentarily...I've dabbled in baked brie, tried a bruschetta or two, but I didn't  know what I could make that would wow anyone.
But aha! (there's always an aha moment).
I've made big quiches before, so why not give mini quiches a try?
I looked online, but wasn't pleased with what recipes I found. Many called for peculiar things like buttermilk or heavy cream (fun but unnecessary). With the help of my favorite recipe inventor, aka my good ol' mommy, I decided to make my own recipe.

Firstly let me say that this recipe will be slightly more difficult if you don't have a background in working with phyllo dough. So-- a few tips and tricks if you're not familiar with it. If you think you'll be okay, skip reading these.
--Phyllo dough generally comes in rolled up flat sheets. First thing you should do when you bring it home (assuming you're going to begin cooking within the hour) is unroll them on cutting boards and place a damp towel over the whole stack of sheets. Keeping phyllo moist makes it infinitesimally easier to work with.
--Don't insist upon working with one sheet at a time. Phyllo is a series of many thin, thin sheets. Rarely do you need just one sheet. Work with 2/3 at a time, it'll tear less and be way more user friendly.
--Work slowly but with purpose. Phyllo needs to be handled carefully but with a certain swift-ness. If you mess with it too much it'll just tear and you'll have a bad time.

Moving on--the recipe shaped up something like this:

Premade Phyllo Dough
8-9 Eggs
1-1 and 1/2 cup of half and half
2-3 cups of shredded cheese (preferably an orange cheddar)
1 package of frozen broccoli (it was out of season! :p)
Salt, Pepper, Cayenne Pepper/Chili Powder, Garlic Powder, to your liking. Don't be too stingy with the salt though--keep in mind this is basically like making a bunch of scrambled eggs...salts a must.

Prep muffin/cupcake baking pans with a shot of pam/cooking spray in each well.

Beat the eggs with a whisk until fully combined, add in the half and half and beat till combined even more. Spice as you wish.

Place the broccoli either in the microwave or in a pot steaming with some water until cooked through but not soggy or too "fall-y apart-y" as I would totally say. 

Now--the work. If your phyllo is on cutting boards as I said earlier, start by taking a knife and cutting the phyllo into squares vertically and horizontally. Each square of phyllo should measure across about a little larger than the diameter of your muffin wells. Then, 2 by two, take squares of phyllo and sort of wrap them into the muffin wells, like they look in the picture below/right. Remember, the less you play with them the better they'll be and the easier they'll be to work with.

Next, place one small(ish) piece of broccoli in each phyllo cup. Follow that with a small smattering of shredded cheese like shown in the picture below. I know, kinda blurry, taken kind of hurriedly.

Finally, pour in the egg mixture in each cup until about a little more than halfway full. The egg certainly puffs up so I would certainly hesitate to fill them too high or you might end up with a scrambled egg oven.

Let bake for 18-26 minutes or until egg is fully puffy and phyllo is browned on bottoms and tips.

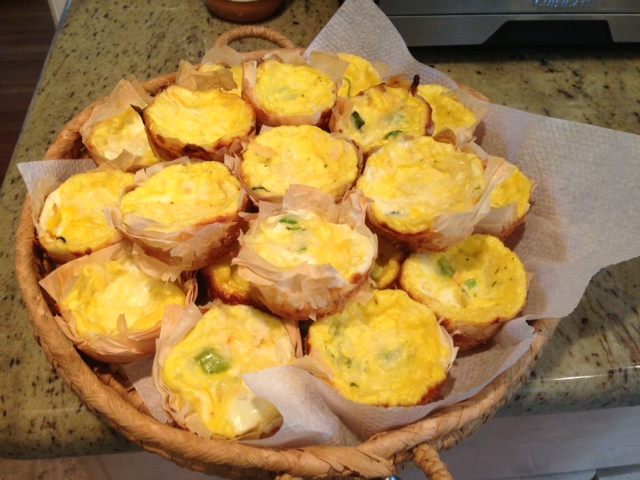
Hope yours turn out as delicious as mine! They were a big hit at the party! Finished quiches bottom right.


Sunday, November 4, 2012

Hurricane cHallah

Woooooooooo
On my 6th day in a row off from school, I'm still thanking Hurricane Sandy for bringing me sleep and extra time to do fun stuff...like cook!
The other day I decided I'd cook up something tasty...and easy because I was exhausted from doing so much nothing during the hurricane. So--I baked up two loaves of my grandpa's famous challah.
For those of you who don't know, challah is basically the Jewish bread of choice. Served at all Shabbat dinners and most holidays (excluding Passover of course) challah can usually be seen on any Jewish dinner table. Needless to say...every Jewish grandpa or grandma thinks THEIR challah is the BEST challah. However, I (of course) insist MY grandpa's challah is the best.
To make my grandpa's challah--you'll either need a bread machine (like I have) or a lot more time, and a lot more kneading. Some bread is better by hand, but challah isn't really one. My grandpa always used a machine, so I do too.

In bread machine:
Liquids in first:
2 eggs
1 cup Water
A little less than 1/3 Cup oil

Mix 3 tsp. yeast into ¼ cup water, when bubbly, combine that in with the liquids.


¼ cup sugar in as first dry after all liquids are in.
Tsp Salt.
Lastly—4.5 cups AP flour.

Turn on Bread Machine, let go for 1.5 hrs. 

When you pull it out, knead it (or it won't rise! mine couldve used a little more kneading..) and add a little bit of flour on the side just to ensure its not too sticky to handle. Then let the dough sit in a cool, damp (maybe cover--but not constrictingly--with a wet towel), place for a little while (approx 1-2 hours) before continuing, in order to let the bread rise further.

When it’s finished rising, split into 2-3 parts. Split those 2-3 into 3 more per each, and braid in challah formation. Basically, line the three parts up in three snakes of dough parallel to each other. Bind at one end, and then put the right most snake into the middle, then the leftmost into the middle. Repeat that until you get to the other end and then bind your dough again. If you're a real pro, cover your challah again like before and let it rise a second time.
Finally,  brush with eggwash (one egg and 1/4(ish) cup water)
Bake in oven at 350 Degrees for 25-40 minutes (just check the oven. when it's brown/golden it should be nearly done).

 Woooo challah! More kneading next time and it'll rise a little more...I could've used a little bit taller! But still tasted great! (And those are little challah rolls with the extra dough after 2 loaves).


Monday, October 15, 2012

Chowin' Down on Cheesecake

Hey Everyone!

Back again, just a month later, with a new post. Well...somewhat new.
A couple months ago I made a New York Cheesecake and never blogged it. I was busy, something got in the way; I don't know. However, a recent trip to New York City over the weekend reminded me to get to blogging that cake named for the Big Apple. Nevertheless--to the recipe:

Most people think that a cheesecake is a hard thing to make. To some degree they're right. While the ingredients and process of prepping a cheesecake aren't too hard, there is one major intangible of the cheesecake--cracking. I had no idea until I actually got into reading recipes, but cracking is a prominent peril for cheesecake bakers everywhere. My only despair. Later in the recipe post I will talk about how to prevent cracking...or how I at least desperately tried to.

Basically--this is a recipe I found online on Allrecipes.com that I changed a bunch because I didn't really love everything it did.

In a LIGHTLY (see those buttery graham crackers? think about it...) greased springform pan...


One normal pack/box of about 16 graham crackers, crushed
ABOUT 2 tablespoons butter, melted
4 (8 ounce) packages cream cheese
1 1/2 cups white sugar
3/4 cup milk
4 eggs
1 cup sour cream
1 tablespoon vanilla extract
1/4 cup AP (not like the classes you're taking!) Flour
 Preheat your oven to 350...

In a medium to large ziploc bag, place as many of the graham crackers as you can fit inside. Close tightly and pound with a meat mallet (if you're lazy) or with your hands (if you're fun) on the outside of the bag against a hard counter top or even the floor. Do this with as many bags of crackers as it takes until they're all ground into a fine mince/grind (not sand, more gravel-y). 
Pour the crackers into a medium bowl and mix with the melted butter. Don't let this recipe bully you--if your crackers look slightly too dry, use a little more than 2 tablespoons of butter. Worst comes to worst..you end up like Paula Deen, chowing down on something a LITTLE less diet friendly. If you're baking a cheesecake you probably aren't thinking about that anyway...
When you're done with them, press the mixture into the bottom of your springform until it creates a full bottom layer.

In another large bowl, cream the cream cheese with the sugar until smooth (preferably with a paddle attached mixer). Furthermore add the milk, then the eggs (1..then the 2nd...then the 3rd...then the 4th). Next add the sour cream (a delicious moisture adder that adds the substance milk can't while adding the lightness that butter or a heavy condensed cream wouldn't). Add the vanilla and flour and combine until smooth. Pour into pan onto crust.

Bake in the oven for 1 hour. Turn the oven off and let the cake sit in the oven for a few (3-4 hours more...TO PREVENT CRACKING! I did this--but still ended up with a huge crack down the middle of the cake. I hope it ends better for all of you presentation wise...
Chill before serving.

All in all--though I didn't get the stylish look I wanted because of the cracking, the cake tasted great! It was a little awkward treating myself to a piece of gourmet cheesecake more than once in that week though. 


Sunday, September 16, 2012

Freaked Out by Fried Chicken

Hey everyone!

Sorry I haven't blogged in a while, I guess that's just what Junior year does to you. However, just because I haven't been blogging doesn't mean I haven't been cooking! As summer came to an end I decided I'd experiment with a food that I'd never have the time or energy to put together during the school year--fried chicken. My faithful cooking servant/mother, when hearing my idea said, "Ooof. That sounds tough..Do whatever you want..." In my mind, I was thinking that fried chicken couldn't be THAT hard. All you do is dip and fry, right?

Well after an hour of cooking, I can tell you it's somewhere in between. The prep, idea, and process of fried chicken is easy. It starts with a chicken that I bought, already broken down, and simply trimmed some fat and cartilage off myself.
I filled a large pot roughly half full with corn oil (though had I had some peanut oil, that might have been better). When I deemed it fit to be fried, I prepared the most important part of a good piece of fried chicken--the dredging to toss each piece into. This was, surprisingly, the easy part. I covered two plates--one with 1/2 AP flour, 1/2 Bisquick mix, and the other with eggs that I beat well. (Mistake, apparently self rising flour is the best.) If you want to jazz up the flour and bring out your inner Colonel Sanders, add some spices like I did. If you want yours like mine...
2 TBSP Chili Powder
Shakes of Salt, Pepper
1 TBSP Garlic Powder
1/2 TSP Cumin


When the oil is hot enough, take a piece of chicken, coat in egg, then flour mixture, then again in egg and again in flour, and place it in the oil. Once the pot is full of chicken, turn the heat down slightly to medium(ish) heat.
Now--THE PROBLEM. I, a novice chicken fryer, was way to excited for the cooking process. I stood there, shifting from foot to foot, twiddling my thumbs, and staring at my frying chicken.
BE AWARE:
Don't pull your chicken out before it's done. Looks done 5 minutes in? It's not. 8 minutes it looks like it's getting a little overdone...It's not. I repeatedly took my chicken out too early the first few fries. I'd take it out, cut a piece open, and gasp at how raw it was. It should take roughly 10-13 minute per piece.
JUST. BE. Patient.


When you're truly sure that your chicken is done, take it out, put it on a plate with a paper towel on it to drain out some of the unnecessary oils. Hopefully, at the culmination, your chicken should look (and taste) as good as this!


Thursday, June 21, 2012

Breakfast at Andy's--Chocolate Chip Scones

SCHOOLS OUT!
Which means....
Every morning I can wake up and NOT have to rush out of the house before the sun is even out. Thus, from a cooking standpoint, I can have a good breakfast every morning! With time to experiment in the kitchen before starting my days, I can have slightly more interesting things than Multigrain Cheerios.
So, to begin my summer of more interesting breakfasts, I made a family favorite. Grandma Johnson's Scones isn't a recipe from our grandmother, or a family recipe that's been passed down, it's simply our family's go to recipe for a good breakfast treat. 
The thing that makes these scones special is their secret ingredient...sour cream! Though it may sound strange, sour cream is actually the perfect thing to go in a scone. The classic dish that ends up always becoming too dry, sour cream keeps even the driest of scones moist.

Beyond the secret ingredient--most of the recipe is predictable. The recipe is as follows: 

1 Cup Sour Cream
1 TSP Baking Soda
4 Cups Flour
1 Cup Sugar
2 TSPS Baking Powder
1/4 TSP Cream of Tartar
1 TSP Salt
1 Cup Butter
1 Egg
CHOCOLATE CHIPS (Unless you're a sissy)

HEAT OVEN TO 350, Line two/three baking sheets with parchment paper.

Thankfully, since it's the morning, the recipe isn't too hard. Combine the dry ingredients (EXCEPT THE BAKING SODA) in a big mixing bowl, cut in the butter, then mix in the egg and sour cream and baking soda thoroughly. Mix in the chocolate chips last.

Once you have the scone dough finished, turn it out onto the counter and lightly flour it, and knead it just until it comes together. Roll it or knead it out into a round (similar to a big pizza round but thicker) and cut the dough into as many wedges as you can. Make them with the assumption that they're rise, but don't cut them TOO small. 


Bake the scones 12-15 minutes or until they're golden brown and a toothpick comes out clean.
Hopefully they look like this!